How to Clean Mold Out of Shower Grout

Mold in the shower is a common and frustrating problem many homeowners face. It’s not just unsightly, but it can also pose health risks if left untreated. Learning how to clean shower grout mold is essential for maintaining a clean and healthy bathroom. In this comprehensive guide, we will walk you through the best methods for how to get mold out of grout, prevent its return, and address common questions. Let’s dive in!

What Causes Mold in Shower Grout?

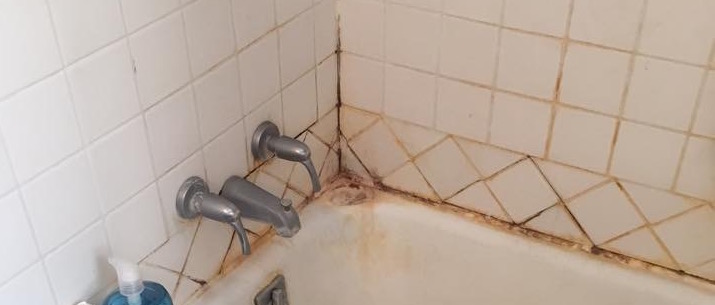
Mold thrives in warm, damp environments, making your shower an ideal breeding ground. The grout between your tiles is especially susceptible because it is porous and can easily trap moisture. Often grout and caulk can harden and crack over time, allowing for moisture to build up in these gaps that promote mold and mildew buildup. This moisture, combined with the lack of airflow in most bathrooms, creates perfect conditions for mold growth.

Types of Mold in Shower Grout

Various types of mold can grow in shower grout, but black mold is the most concerning. Black mold (Stachybotrys chartarum) is known for its dark appearance and potential health hazards. Knowing how to remove mold from shower tile grout, particularly black mold, is crucial for a safe and clean bathroom.

How to Clean Shower Grout Mold: Step-by-Step Guide

Materials Needed

  • White vinegar
  • Baking soda
  • Hydrogen peroxide
  • Dish soap
  • Spray bottle
  • Old toothbrush or grout brush
  • Sponge or cloth
  • Protective gloves and mask

    baking soda for cleaning grout mold

Step 1: Prepare Your Cleaning Solution

One of the most effective and natural methods for cleaning mold out of shower grout involves using a mixture of white vinegar and baking soda.
Vinegar Solution: Fill a spray bottle with white vinegar. Vinegar is a natural mold killer and disinfectant.
Baking Soda Paste: Mix baking soda with a small amount of water to form a thick paste.

Step 2: Apply the Vinegar Solution

Spray the vinegar solution directly onto the moldy grout. Allow it to sit for at least 15 minutes to penetrate and kill the mold spores.

Step 3: Scrub the Grout

Using an old toothbrush or grout brush, scrub the grout lines thoroughly. The vinegar will have loosened the mold, making it easier to remove. If stubborn spots remain, apply the baking soda paste to those areas and scrub again.

Step 4: Rinse and Dry

Rinse the area with warm water to wash away any remaining mold and cleaning solution. Use a sponge or cloth to wipe down the tiles and grout, then dry the area completely with a clean towel. Ensuring the grout is dry is crucial to prevent mold from returning.

Alternative Methods for Cleaning Mold Out of Shower Grout

If vinegar and baking soda don’t fully get rid of the mold, consider these alternative methods:

Hydrogen Peroxide and Baking Soda

Mix hydrogen peroxide with baking soda to form a paste.
Apply the paste to the moldy grout and let it sit for 10-15 minutes.
Scrub the grout with a brush and rinse thoroughly with water.

Commercial Mold Removers

Many commercial products are specifically designed to remove mold from shower grout. Follow the product instructions for the best results and ensure proper ventilation when using chemical cleaners.

Bleach Solution

Bleach is a strong cleaner that can effectively kill mold but should be used with caution. Mix one part bleach with ten parts water, spray onto the grout, and let it sit for 5-10 minutes. Scrub and rinse thoroughly.

cleaning shower grout with cloth

Preventing Mold in Shower Grout

Knowing how to get mold out of grout is only half the battle. Preventing mold from returning is equally important. Here are some tips to keep your shower grout mold-free:

Improve Ventilation

Ensure your bathroom has adequate ventilation. Use an exhaust fan or open a window during and after showers to reduce moisture levels.

Regular Cleaning

Regularly cleaning your shower and grout can prevent mold from taking hold. Wipe down tiles and grout with a squeegee or towel after each shower to remove excess water.

Use a Daily Shower Spray

Consider using a daily shower spray that contains a mild disinfectant. These sprays can help keep mold and mildew at bay between deep cleanings.

Seal Your Grout

Sealing your grout creates a protective barrier that repels moisture and prevents mold growth. Apply a grout sealer every six months to a year to maintain its effectiveness.

rubber gloves, cloth, spray bottle, sponge, cleaning solution

Frequently Asked Questions

How do you get black mold out of shower grout?

To get black mold out of shower grout, use a mixture of white vinegar and baking soda or hydrogen peroxide and baking soda. Apply the solution to the moldy grout, scrub with a brush, rinse, and dry thoroughly. For stubborn mold, consider using a commercial mold remover or bleach solution.

How do you remove mold from shower tile grout without chemicals?

You can remove mold from shower tile grout without chemicals by using natural cleaners like white vinegar and baking soda. These substances effectively kill mold and are safe for the environment and your health.

How do you get rid of mold in shower grout permanently?

To get rid of mold in shower grout permanently, clean the grout thoroughly and implement preventive measures. Improve bathroom ventilation, clean and dry the shower regularly, use a daily shower spray, and seal the grout.

Can I use bleach to clean mold out of shower grout?

Yes, you can use bleach to clean mold out of shower grout, but use it with caution. Bleach is a powerful cleaner that can damage grout and tile if not used properly. Always dilute bleach with water (one part bleach to ten parts water) and ensure the area is well-ventilated during use.

Is it safe to clean mold out of shower grout?

Yes, it is safe to clean mold out of shower grout if you take proper precautions. Wear protective gloves and a mask to avoid contact with mold spores and cleaning solutions. Ensure the area is well-ventilated, especially when using chemical cleaners like bleach.

Conclusion

Learning how to clean shower grout mold is essential for maintaining a clean and healthy bathroom environment. By using the methods outlined in this guide, you can effectively get mold out of grout and keep it from returning. Remember to implement preventive measures such as improving ventilation, regular cleaning, and sealing your grout to ensure a mold-free shower. With these tips, you can enjoy a spotless, fresh-smelling bathroom and peace of mind knowing your home is free from harmful mold.

Need a More Professional Shower Grout Cleaning? Choose Cyclone Professional Cleaners for Your Toughest Jobs!

If you’re in Plano or the surrounding North Dallas, Texas area and need a more professional cleaning of your shower grout, contact Cyclone Professional Cleaners. We handle even the most set-in mold or mildew with ease and use our state-of-the-art equipment to steam clean your shower. We have the biggest truck-mounted steam cleaning machines in the Dallas area and cleaning solutions to handle the toughest mold. For the most stubborn cases, we will scrape out affected areas and freshly grout, caulk, and touch up your grout for easy future maintenance. We think you’ll find it well worth the investment for the beautiful, like-new bathroom! We will deliver you a cleaner shower, and we guarantee our work; we are an accredited cleaning company with an A+ Better Business Bureau rating. For a better-looking and safe shower, call us at 972-390-8700 or request a quote online today!

How to Remove Carpet Odors

If you have a carpet, you know it can be a challenge to keep it clean. But it’s not enough that your carpet just looks clean. Carpets can trap a wide variety of odors which can then linger, giving your carpeted room an unpleasant smell that permeates throughout.

Tips for Removing Carpet Odors

What can you do to remove odors from carpet? Here are three useful ideas on how to get smells out of the carpet in your home.

1. Baking Soda

Ah, the miracle of baking soda. Baking soda is an all-purpose solution that’s well known for its ability to absorb odors. To use baking soda to remove odors that are trapped in the carpet, start by simply layering your carpet with baking soda, distributing a thin layer all throughout the affected area and smoothing out any clumps.

Let the baking soda sit and do its work for several hours — or an entire day if possible. Make sure you keep pets and children away from the area you are treating. Once enough time is passed, vacuum up the baking soda and all the odors with it!

2. Vinegar

This can be an effective treatment if you have smokers in your home. Smoke odor can easily trap itself in your carpet and can be difficult to get rid of. Leave several bowls of white vinegar around the room where the smoke order is prevalent. Believe it or not, this will absorb the odor from the air. Let it sit for 24 hours, then apply the baking soda treatment above. You can also strengthen your ability to remove stains and odors by spraying a white vinegar solution on your carpet, either on top of the baking soda or already mixed with baking soda.

3. Steam Cleaning

The only reliable way to remove stains and odors from your carpet long-term is with a quality commercial steam cleaning of the carpet. Steam cleaning lifts the smells and stains out of the carpet and leaves you only with luxurious, clean carpet.

How to Remove Pet Odors from Carpets

Before you start any kind of cleaning routine, make sure your cleaners are non-toxic and can safely be used around pets. This is important because:

  • Your dog’s nose is closer to the ground, making them more susceptible to breathing in large quantities of harmful fumes.
  • Your dog will likely lay on the floor, which was coated in cleaner.
  • Some ingredients, such as some types of essential oils, cannot be used around pets.

The safest and best way to clean floors with dogs is to keep them in a separate location. Then, make sure the floor is rinsed well before allowing them back on it.

Steps for Removing Pet Odors & Waste From Carpets

After you’ve gotten rid of the waste your pet has left behind you’ll want to deal with the odor. What is the best way to remove pet odors from a carpet? The most significant pet odor problem people tend to have is when your beloved companion has a little accident on the carpet. Here is a six-step process to help you deal with that stinky mess.

Step 1: Soak Up the Wetness

To start, get the gloves on and use paper towels to soak up any urine, vomit or whatever foul-smelling substance your pet has left behind. It is better to blot the wetness, instead of rubbing it all around.

Step 2: Dishwashing Detergent

Wet the area down with a paper towel, then squirt some eco-friendly dishwashing detergent on another paper towel and blot the affected area.

Step 3: Baking Soda

Once you’ve thoroughly blotted the area with the detergent, coat the whole thing with baking soda.

Step 4: Wait Overnight

Give the baking soda and detergent the night to work its way into the pet stain. If possible, cover the area with paper towels. Be sure to keep your pet and any children away from the area while you’re treating it.

Step 5: Add Vinegar

The next day, spray white vinegar onto the area. You may notice some foaming — this is good, as the reaction should eliminate the smell.

Step 6: Soak it Up

After about five minutes, wipe up the remaining cleanser and blot dry.

Are There Other Options?

If you’re dealing with a heavy-duty stain or odor then more aggressive cleaning methods may be necessary:

  • Steam Cleaning for Pet Waste – This method will often be very effective at dealing with pet stains, and the vinegar should take care of the odor. However, if you’re dealing with large or multiple stains that have had a chance to set before you could get to them, you will probably need professional help.
  • Investing in a Good Wet Dry Vacuum – A hand-held model should be sufficient. Attack the stain as soon as it happens — or at least as soon as you discover it. Start by going over the stain a few times to pick up any waste that is sitting on the carpet. Once you’re left with just the liquid stain, start spraying the stained area with water from a spray bottle, vacuuming as you go, so the water loosens the stain, and the vacuum pulls it up.

Choose Cyclone Professional Cleaners for Your Toughest Carpet Odors

If you’re in the Plano, Texas, area and have need of a professional carpet cleaner, contact Cyclone Professional Cleaners. We handle even the most set-in carpet odors with ease and use effective but safer techniques, including eco-friendly biodegradable carpet-cleaning residue-resistant cleansers. We have the biggest truck-mounted steam cleaning machines in the Dallas area and solutions to handle not only synthetic materials, like nylon, olefin, acrylic and polyester, but wool carpets and a variety of other carpet types to suit your needs.

Our steam cleaning and other carpet cleaning methods are faster, better for your carpet, more effective and longer-lasting than most do-it-yourself solutions, and we think you’ll find it well worth the investment for the beautiful, odor-free carpet we’ll leave you with.

We will deliver you a cleaner carpet, and we guarantee our work, so you have nothing to lose but unpleasant carpet odors and stains from pets, smoke and more. We are an accredited carpet cleaning company with an A+ Better Business Bureau rating. For a better looking and smelling carpet, call us at 972-390-8700 or contact us online today!

How to Remove Carpet Stains

There are few things more appealing than a beautiful carpet that perfectly complements the room it’s in. But the nicer that carpet is, the more anxiety you probably have about keeping it clean. Some may have more success than others, but getting carpet stains is inevitable.

3 Simple Steps for Removing Carpet Stains

If you plan on keeping your floor covered, you have to know how to remove stains from carpet. But what is the best way to get rid of carpet stains? Here’s a three-step carpet stain removal process that may help.

1. Remove Debris

Before trying to get the stain out, remove everything that is above the carpet. Pick up or vacuum up any dirt, debris or other solid material. Gently blot up any liquid with a paper towel. You want to avoid rubbing anything into the carpet while trying to remove a stain.

2. Spray on a Cleaning Solution

To protect your carpet and keep your home environmentally-friendly, you can make a very effective, safe cleaning solution using white vinegar and baking soda. Take a cup of warm water and mix in a quarter teaspoon of white vinegar and a quarter teaspoon of baking soda. Mix it together and pour it into a spray bottle. You can increase the amounts proportionally depending upon how much you need. You can also add a drop or two of lemon oil to create a pleasant odor.

Spray the solution directly onto the stain and let it sit for about 10 minutes or so.

3. Remove Your Solution

After the appropriate amount of time, blot the area with a paper towel, and most of the stain should lift away. If you are not happy with the results, you can repeat the procedure. Follow up by dabbing the area with a washcloth to get rid of any excess cleanser, blot dry, then vacuum.

How to Remove Specific Liquids

For instructions on how to remove specific liquids see our instructive links below:

Steam Cleaning for Stain Removal

For many day-to-day stains, the above can be effective. However, if you have a tough stain or your carpet has collected multiple stains over the years, you may need to look elsewhere. Using store-bought cleansers can be bad for your carpet and your health, and cleaners with bleach will almost certainly ruin your carpet.

In these cases, the best solution is steam cleaning your carpet. If you are in Plano, Texas, or elsewhere throughout the Dallas metropolitan area, contact Cyclone Professional Cleaners for safe, effective carpet stain removal. We’ve been cleaning the carpets of our satisfied customers in Texas for more than 17 years and have experience with all types of carpets.

We can assess your carpet needs and figure out the best way to take care of those tough stains, which may include our truck-mounted steam cleaning machines, some of the biggest in the Dallas area.

If you’re ready to say goodbye to those tough stains forever, let us know! Our workmanship is guaranteed, and we strive to be eco-friendly and residue resistant with our carpet-cleaning solutions. For a free quote over the phone, call us today at 972-390-8700 or contact us online now.

Say Goodbye to Food Stains: Effective Carpet Cleaning Tips!

If you own a carpet, you have no doubt battled a stain before. For many, the best way to make sure you don’t end up with food stains on your carpet is to create a rule that no one ever brings any food into the carpeted area. However, this is not always feasible or desirable, and sooner or later, almost every carpet owner will need some tips for removing food stains from their carpet.

Red juice being spilled on a carpet

3 Simple Steps for Removing Food Stains From Carpets

Whether you’ve dealt with removing food stains from your carpet before or want to be ready if you ever have to, follow this three-step food stain removal process.

1. Get Rid of the Food

The first step in getting a food stain out of carpet is removing the offending food. Act as soon as you observe the food making contact with your carpet, remove whatever you can by hand. What you can’t, vacuum up. If food has already become stuck in the carpet, scrape it loose with a butter knife or the edge of a credit card. Do this carefully so as not to damage the carpet fiber.

2. Wet and Blot

Then, blot up any liquid from the stain with a paper towel or white rag. Once you’ve blotted up all you can, spray the area with water from a spray bottle to loosen up as much of the stain as possible from your carpet and continue blotting until no more of the stain will come up onto your rag or towel.

3. Mix up a Stain Fighter

You can mix up a very effective stain-fighting solution by combining a ¼ teaspoon of baking soda and ¼ teaspoon of white vinegar in a cup of warm water. Pour it into a spray bottle and shake it up — you can even add a drop of lemon oil for aroma. Spray the mixture all over the food stain, give it about 10 or 15 minutes to work its way in, then blot it up until the food stain is out of the carpet. Drop on some more baking soda and vacuum over the area at the end to straighten out the carpet.

Need Help Removing Other Liquid Stains?

For instructions on how to remove specific liquids see our instructive links below:

Steam Cleaning for Food Stains

This procedure is all well and good, but some stains may be too tough for it. This is particularly likely if you didn’t notice the stain right away and it had time to set. Getting dried food out of carpet is much more difficult. If you have set stains on your carpet, you need more than a do-it-yourself solution. You need the pros.

Texans know that for tough carpet stains and odors, they want the company with an A+ rating from the Better Business Bureau that also has some of the largest and most powerful truck-mounted steam cleaning machines in the area.

Call Cyclone Professional Cleaners today and we’ll take on your food stains, wine stains, pet stains, or whatever else you can throw at us. That’s our promise and our workmanship is guaranteed. To find out how we can treat your stains now, contact us online for a free estimate or call us today at 972-390-8700 to get started.

How to Remove Dirt, Mud, Soil and Grass Stains on Carpets

No matter how many times you insist everyone take their shoes off before walking on the carpet, somehow, someone always seems to track dirt stains onto it. If you have kids or pets, forget it — your carpet doesn’t stand a chance. Have you given up on trying to remove grass stains from carpet? Have you wondered, “What is the best way to get mud out of carpet?”, but to no avail? If you want to know how to get dirt out of carpet — or grass stains or mud or soil— we’ve got you covered.

Tips for Getting Dirt, Grass, Mud or Soil Out of Your Carpet

The moment you notice grass stains, mud or soil on your carpet, take the following three steps.

1. Remove All Debris

First, get everything you can off of the area. Scrape off any mud that’s stuck on with a credit card or similar edge. Vacuum up any excess soil or grass.

2. Moisten and Blot the Stained Area

Put some water in a spray bottle and thoroughly spray the area. Once the entire area is wet, use a paper towel or white rag/towel to blot up as much of the dirt stain as you possibly can. Repeat for as long as the stain keeps appearing on your transfer rag or towel.

3. Add Detergent Solution

Mix a tablespoon of your favorite dishwashing solution without any potentially damaging additives like bleach or lanolin. Dip a sponge or rag in the solution and use it to work the solution into the stained area of the carpet. Once you’ve saturated the stain, blot the area with paper towels. Continue until you’ve gotten out all the grass or mud, then spray with more water and blot dry to pull up any leftover detergent solution.

Steam Cleaning for Grass, Mud or Soil Stains

While the method described above can be effective for getting out dirt, grass, mud or soil stains when you treat the stain quickly, deep dirt stains that have had time to set or are firmly ground into the carpet can be much harder to remove. In cases where these deep dirt stains resist your efforts, a professional carpet cleaning service that offers powerful steam cleaning is your best option. Steam cleaning can safely and effectively remove many dirt stains from your carpet that homemade or store-bought cleansers cannot.

If you’re looking for quality steam cleaning and stain removal in Plano, TX, or the North Dallas metro area in general, contact Cyclone Professional Cleaners right away. Our large, powerful truck-mounted steam cleaners and trained carpet cleaning experts can take on even some of the toughest carpet stains and have your carpet looking practically new.

We have more than 17 years of carpet cleaning experience, are an accredited business with the Better Business Bureau with an A+ rating, use safe residue resistant cleansers and offer a workmanship guarantee.

If you’re ready to get rid of those troublesome stains and have your carpet looking and smelling fresh again, get in touch with Cyclone Professional Cleaners. Call us at 972-390-8700, or contact us online to get started.

How to Remove Juice & Soda from Carpets

If you have kids and a carpet, you’ve likely dealt with this problem before. Even if you’re an adults-only household, you probably have either had to live with or live in fear of the nightmare of soda or fruit juice stains on the carpet.

Either way, if you have a nice carpet, you can do whatever you can to protect it, but sooner or later you are going to need to know how to remove juice or soda from a carpet. Here is a method that should help, along with tips for getting soda stains out of a carpet.

Red juice being spilled on a carpet

3 Simple Steps for Getting Liquid Stains Out of Carpet

Whether you are dealing with a juice stain or a soda stain, follow these three steps:

1. Soak up What You Can as Soon as Possible

As soon as the stain occurs, get on it with a paper towel or white rag — dyed rags could bleed color onto the carpet — and blot the area. Blot from outside the stain inward and do not rub, as this could work the stain further into the carpet fibers.

2. Wet Down the Stained Area

Once no more juice or soda is coming onto your towel from blotting, wet down the area with a damp rag or spray bottle to moisten the area and help additional juice or soda separate from the carpet. Repeat the blotting procedure.

3. Apply Cleaning Solution

You can make a safe, effective stain removing solution by combining a tablespoon of your favorite dishwashing liquid with two cups of warm water. Make sure you’re not treating the stain with anything containing bleach or lanolin, which can ruin your carpet. Soak a sponge in the solution and work it into the carpet, then blot the area with a paper towel. Repeat until the stain is gone, then spray the area with water and blot again to get rid of any residual detergent.

Do You Have Other Liquid Stains?

For instructions on how to remove specific liquids see our instructive links below:

Steam Cleaning for Soda or Juice Removal

If you’ve waited too long to try to remove the stain or it’s just too big or ingrained to remove using the above method, it’s time to call in the experts for professional steam cleaning. If you live in Plano, TX, or anywhere else in the north Dallas metropolitan area, it’s time to bring in Cyclone Professional Cleaners.

Cyclone Professional Cleaners is one of the most trusted names in carpet cleaning in Texas, with an A+ rating from the Better Business Bureau and well over a decade’s worth of satisfied customers with clean carpets. We have multiple methods of removing stains from your carpet, including powerful truck-mounted steam cleaning machines that are some of the largest in the entire Dallas area. We also provide organic, eco-friendly, residue-resistant cleaning methods for protecting your home and the environment.

We offer a workmanship guarantee — if it’s possible for your carpet stains to be removed, we won’t rest until we’ve finished the job. To say goodbye to those stains right now, contact us online for a free cleaning quote or call us at 972-390-8700 anytime.

Does Professional Grout Cleaning Work?

Your home’s tiles offer durability and beautiful aesthetics. Over time, contaminants will build up, increasing the likelihood of bacteria or mold. Keeping your bathroom or kitchen backsplash tiles clean is essential to prevent damage and maintain your stunning floors for years.

Many homeowners debate between tackling the project themselves or bringing in professionals. Each option yields different results, so it’s essential to know whether professional grout cleaning is worth it and the benefits of these services.

how do professionals clean grout differently

How Do Professionals Clean Grout Differently?

A professional team will use stronger, less harmful cleaning products and tools to get deeper and seal your grout when necessary. They have the knowledge and tools to clean your tiles and wash your grout to leave it looking brand new.

Here are some benefits of professional tile and grout cleaning services:

1. Extend Your Floor’s Life Span

Professional grout cleaning extends the working life of your floor and other grouted surfaces. Experts know what type of tile and surface they are working with and what they need to do to increase its longevity.

Professional cleaners also extend your floor’s life span by reducing the likelihood of mold and other contaminants growing over time. Trained technicians will advise you on how to protect your surfaces between deep cleaning appointments.

2. Improve Your Home’s Health

You use your bathroom and kitchen and walk over your tiled floors daily. The high traffic through these areas and constant usage means increased exposure to contaminants. Bathrooms have high moisture levels, making them ideal for bacteria, mold and mildew to thrive.

Some pollutants are invisible, meaning even if an area looks spotless, it can still be contaminated with disease-causing organisms. Bacteria, mold and other organic impurities damage your health and deteriorate the grout and tile surfaces.

When you hire professionals, they will remove contaminants with specialized equipment and products and seal the surfaces, improving your home’s health and protecting your surfaces from harm.

3. Save Money and Time

You may believe cleaning your tiles and grout yourself will save money. If you consider the chemicals, equipment and tools you need, costs quickly add up, and no matter how hard you scrub, professional cleaning solutions can penetrate the surfaces more deeply than lower-strength ones. Our professional home cleaners also seal the grout, making it stay cleaner and protected for longer.

Time is your most valuable commodity. Avoid spending your precious time scrubbing tiles on your hands and knees with an old toothbrush. Experts clean more effectively and quickly than any mop, bucket, and home equipment or cleaning product could.

4. Enhance the Look of Your Grout and Tiles

When looking at our before and after pictures, it is clear that professional grout cleaning really does work. With time, grime and spills leave grout discolored. No matter how hard you scrub, you cannot lift the dirt from the porous surfaces.

Professionals will help your grout and tiles look their best. Their specialized equipment and expert techniques remove the sticky residue that locks in dirt. Experienced tile, stone and grout cleaners seal the areas, keeping the surfaces pristine for longer.

5. Protect Your Surfaces From Abrasive Chemicals

Grout and tiles are porous, which is why many people need help getting that good-as-new look. To renew the surfaces, individuals turn to harsh chemicals to lift dirt and grime off floors. Using professionals instead protects your tiles and grout from toxic and abrasive chemicals.

Experts have specialized industrial equipment that deeply penetrates surfaces safely and effectively. The results are incomparable, and you will see that professional grout cleaning is worth it.

Satisfactory vs. Superior Results

You can clean your tiles yourself and achieve satisfactory results. After searching for an effective cleaner and spending hours scrubbing, you might see an improvement. However, your DIY attempts will often result in noticeably dirty tiles. Traditional household cleaners rarely work well and can often damage your tiles, and regular mopping doesn’t get deep enough to tackle contaminants that build up in those hard-to-reach places.

How Much Does Professional Tile and Grout Cleaning Cost in Plano, Texas?

Many cleaning companies prefer that you schedule a consultation to discuss their professional tile and grout cleaning costs. These kinds of services depend on several different factors, from the size of your space to the company’s requirements. Many companies also provide discounts and coupons as promotions to help decrease your price.

According to HomeAdvisor, the national average tile and grout cleaning service costs range from $281 to $652. These prices seem to be lower in the Plano, Texas, area, coming in around $1.25 per square foot but can increase up to $3. For an average-sized job, this will come out to about $75 to $150 to get your grout and tile cleaned by professionals. Some things that could change the cost include:

  • Cleaning package
  • Additional services, such as sealer
  • Square footage
  • Company reputation

Why Hire Cyclone Professional Cleaners in Texas

Tackling the dirt that gets stuck in your tiles and grout can be such a hassle, and you might not get the results you want. Leave the cleaning to our Plano, Texas, professionals, who bring the necessary equipment to get rid of dirty floors. With more than 20 years in the cleaning business, we know what it takes to tackle everyday dirt and turn your tiles back into the sparkling floor you love.

For more information about our grout cleaning services or costs, give us a call at 972-390-8700 or contact us online today!

6 Steps to Clean Your Dryer Vents

Cleaning Dryer Vents

When people think about cleaning their dryer, they often only think about cleaning the lint filter. However, the dryer vent is another vital part of the dryer you should not overlook. If you find yourself questioning whether it’s worth cleaning your dryer vent, it is! Find out why here.

Why Is It Important to Clean Your Dryer Vent?

Cleaning your dryer vent is important for a plethora of reasons. By not cleaning your vent, some major problems can occur that can do damage to you, your house or your wallet.

A dryer needs its vent cleaned regularly to run efficiently. If it doesn’t get cleaned, this leads to excessive wear and tear on the dryer, causing it to run inefficiently. This can cause higher utility bills since the dryer will have to run more often to get its job done.

When you don’t clean your dryer vent, lint builds up. A clogged dryer vent cannot ventilate warm air properly, leading to the built-up lint potentially causing a fire. Additionally, an unclean, debris-filled dryer vent can cause carbon monoxide (CO) gases to build up, leading to potential carbon monoxide poisoning.

Dryer Vent Cleaning Tools

When cleaning your dryer, several tools and materials are important to ensure the process goes smoothly. The tools you may need include:

  • Vacuum cleaner
  • Work gloves
  • Auger snake
  • Microfiber cloth
  • Vent hose clamps/brackets
  • Screwdriver
  • Leaf blower
  • Vent cleaning brush

Once you have these tools, you’re ready to start cleaning your dryer vent.

How to Clean Your Dryer Vent in 6 Steps

To safely and properly clean your vent, you’ll need to take several steps:

Step 1: Cut Power to the Dryer

The most crucial step is to cut your dryer’s power. When you do this, you ensure you can safely work on the vent. Cutting the power can be as simple as unplugging the unit, though sometimes you may have to move your dryer from its current position. If your dryer is too heavy for you to move on your own, get help from a friend or family member to ensure you don’t hurt yourself.

Step 2: Find the Dryer Vent

The next step is to locate your dryer vent. You can identify it by looking for a silver or white hose in the back of the dryer. The hose is usually around 4 inches wide and is made of flexible white vinyl, thin aluminum foil, semi-rigid aluminum or rigid aluminum piping.

Step 3: Disconnect Your Vent Hose From the Wall

After you’ve successfully identified your dryer vent hose, disconnect it from your wall. To do this, pull the dryer out as far as your vent hose will allow, then loosen the clamps with a screwdriver. The clamps should be able to move along the dryer hose once you’ve loosened them. Slackening the clamps helps you avoid damaging the vent. The last thing to do before removing the vent from the wall is to get a garbage bag ready to catch any debris that may come out.

Step 4: Detach and Vacuum the Hose

After removing the hose, there are various ways to get rid of most of your vent’s debris. One of the easiest ways is to use a hose attachment for your vacuum to remove clumps of lint and hair. When using a vacuum cleaner, make sure you work from both sides of the hose and continue vacuuming until you remove the debris.

Detach and Vacuum the Hose

You can also use a leaf blower to blow the debris out of the hose. If you’re using a leaf blower, ensure you have a garbage bag ready to catch the debris to avoid making a mess. However, keep in mind using a leaf blower may not be as efficient as a vacuum cleaner for some homes.

If you have tough clogs that are hard to remove with a vacuum or leaf blower, use an auger snake to break up the clog. Auger snakes can efficiently disintegrate clogs, allowing you to use your leaf blower or vacuum to remove the leftover debris easily.

After you clean the dryer hose, go outside and remove the exterior vent. Using a vacuum, clean the dryer vent from the outside by using a vacuum.

Step 5: Clean Out Any Residual Debris With a Brush

After removing most of the lint and dirt with your vacuum or leaf blower, there may still be some residual dust, hair or lint left. Dryer vent cleaning brushes are the perfect item to remove this remaining debris. Their design includes a multi-sided brush and an extendable handle, allowing them to move through the brush hose effectively. After you clean it with the brush, your vent will be free of excess debris and completely renewed.

Step 6: Clean the Vent Cover and Reconnect the Dryer

Before reconnecting your dryer, wash your vent cover to ensure any leftover debris doesn’t clog up the dryer. Washing the cover is as easy as vacuuming up excess lint, placing the vent cover in hot, soapy water and using a microfiber cloth to clean it. After the vent cover dries, you can reattach it and start reassembling your dryer.

To reconnect your dryer, start by reinserting the vent hose and reattaching the ductwork. Ensure the ducts are undamaged and meet the proper safety standards. When your vent is clean and reattached to the dryer, you can plug your dryer back in and move it into place. Run your empty machine on the air-dry setting for 15 to 20 minutes to ensure everything works correctly.

Common Dryer Vent Cleaning Questions

Most people aren’t well informed on dryer vents and the importance of cleaning them. Fortunately, we have some helpful answers for those looking to clean their dryer vents.

How Often Do I Need to Clean My Dryer Vent?

The National Fire Protection Association (NFPA) and most dryer manufacturers recommend you clean your dryer vent once a year to help prevent dryer fires.

How Can You Tell If Your Dryer Vent Needs to Be Cleaned?

There are a few major indicators that you need to clean your vent. If it takes much longer for your clothes to dry, your clothes have a burning odor or your laundry room is unnaturally hot when you operate the dryer, you may want to clean your vent.

Can I Clean My Dryer Vent Myself?

Yes! You can clean your dryer vent yourself. To properly clean your vent, ensure you have a few free hours so that you can carefully follow the guide on how to clean it. If you don’t feel comfortable cleaning it yourself, you can always hire a professional company to clean it for you.

Hire Cyclone Professional Cleaners Today for Dryer Vent Cleaning

Hire Cyclone Professional Cleaners Today for Dryer Vent Cleaning

If you need your dryer vent cleaned, choose Cyclone Professional Cleaners. We have almost 20 years of experience servicing Plano, Frisco, Dallas, Mckinney, Allen and everywhere in between. We care for your home by using healthier products, methods and equipment. On top of that, we also offer a 30-day workmanship guarantee. Schedule your dryer vent cleaning today by requesting a quote from us.

Complete Spring Cleaning Checklist to Refresh Your Space

Table of Contents

How to Tackle Spring Cleaning

The tradition of spring cleaning helps ensure we get our homes cleaned out top to bottom at least once a year. Cleaning in spring also gets you ready for all the fun of summer. Today we’ll be going over a spring cleaning list that will help you tackle spring cleaning and get your house, business, or property ready for the summer!

When to Start Spring Cleaning

Technically, spring cleaning can happen at any time your home needs a thorough sorting out, but many homeowners aim for early spring. It’s a good time to clean up before summer, when schedules get busier with social activities and more dust and heat can enter the home.

It’s best to start your tasks on a weekend or long weekend, if possible, so that you have plenty of time. Start in the morning, and be sure to give yourself multiple breaks during the day so you don’t overdo it.

Your Spring Cleaning List a man starting his spring cleaning checklist

Use this handy checklist to make sure you get every part of your home clean:

  • Dust first: Dust ceiling corners, light fixtures, crown molding, lamps, ceiling fans, bookcases and lampshades. Wipe down all surfaces, objects, mirrors and wall hangings.
  • Remove scuff marks and obvious stains: Look for marks on baseboards, doors, walls and other surfaces. You may need to touch up the paint in some spots to cover scuffs and imperfections. Look at your upholstery, and address stains by following manufacturer directions for stains.
  • Give surfaces a good clean: Wipe down walls and doors as well as light switches and outlets.
  • Wash soft surfaces: You can throw some curtains and rugs right in your washer. For blinds and heavy curtains, you may want to use a steamer or vacuum. Steamers may work for rugs and upholstery cleaning, but always read care instructions before attempting to clean these items. Some have special directions.
  • Clean your windows: Work from the top down and buff to avoid leaving streaks. Be sure to get the frames, screens, outside surfaces and corners.
  • Polish wooden furniture: Wipe these pieces down to remove any marks, and throw any pillows or cushions into the wash if they can be laundered that way. Be sure to clean under the cushions and under the legs as well as around the base of each piece of furniture.
  • Condition leather: If you have leather furniture, give it a good wipe down and use a leather conditioner to bring back the gleam.
  • Tackle the floors: Use a steam washer or give your hard surface floors a deep scrub manually. For carpets, give them a thorough vacuum, address any stains and schedule a professional shampoo. Be sure to get the edges and corners of each room.
  • Address the air: You can’t see debris in your air, but it can make your home less fresh. You can address it by cleaning your air vents and changing your furnace or air filter. If you have a fireplace, schedule a chimney sweep and clean the fireplace area. This is also a good time to replace the batteries in your carbon monoxide detector and smoke detector.
  • Take care of the kitchen: In the kitchen, sort and organize your food, dishes and cutlery. Throw out anything that’s no longer usable, and organize the rest. Clean inside and outside your appliances along with all surfaces in the kitchen. In your bedrooms, clean the mattress, under the bed and inside the closets. In each room, be sure to clean the major areas as well as any spaces where debris and clutter can live.
  • Remember the outdoors: Outside, power wash surfaces, touch up the paint, clear debris and clean out the garage and walkways. Replace any lighting, and trim back any branches or plants. Clean your vehicles too, as well as any outdoor furniture.

Spring Cleaning Tips

Before you tackle everything on your spring cleaning list, make sure you:

  • Have all your tools on hand before you start: Ideally, you should have a HEPA vacuum to remove fine debris. You should also gather cloths, paper towels, a steam cleaner, mops, brooms and everything else you might require.
  • Read before you clean: Instructions for various appliances and furniture pieces are available online. It’s important for you to read them to ensure you use the correct cleaning methods to care for your purchases.
  • Think green: Instead of harsh chemicals, consider natural cleaners like baking soda, vinegar and water to clean some surfaces, then try a steam cleaner to clean and disinfect without solvents.
  • Work top to bottom: This way, debris and dust will fall to the floor, and you can vacuum it up last.
  • Remove everything from each area: If you want to clean a closet, mantel, fridge, junk drawer or anything else, first remove everything, then wipe down the surface or interior. Then, clean, organize and replace each item back in its spot, tossing out what you no longer need.
  • Clean Regularly: Feel free to follow this check list 4 or 5 times a year so your home doesn’t build up tons of dust and debris. Cleaning in the winter can also be beneficial!

How Can I Make Spring Cleaning Easier?

Spring cleaning a whole home is daunting. You may need to break the task up into several weekends. Another option is to call the professionals. Professional cleaners know how to expertly clean each item, and they have access to professional-grade cleaning tools to ensure a deep clean.

Cyclone Professional Cleaners has been offering ethical, thorough and green cleaning solutions since 2001, and no job is too big for us. If you’d like to learn more, get a quote from Cyclone Professional Cleaners today.

4 Health Benefits of Air Duct Cleaning

The air that cycles through your home’s ducts multiple times per day is the same air you breathe, so you want it to be as clean as possible. Even if you clean your home regularly, dust and dander can collect in your vents. Unfortunately, dirty vents can taint the air and cause respiratory issues for sensitive people.

As a solution, professional cleaners can help clean your dirty air ducts for a healthier indoor environment. Here are four reasons why you should clean your air ducts:

1. High-Quality Air

Residents of North Texas are used to bracing themselves for allergy season every spring. They’re exposed to many different allergens and contaminants since the weather is too warm to kill mold spores. Additionally, as temperatures continue to rise, pollen concentration in the air is growing higher every year.

This substance can hitch a ride on your clothes, shoes, and even on your pets — it’s astonishing how much pollen your pets can track in on their fur. While it’s nearly invisible, it can blanket your home and cause vulnerable family members to develop a runny nose, watery eyes, and non-stop congestion.

Anyone who suffers from allergies will struggle to find relief in a home with dirty air ducts. Various allergens can build up in a contained home environment. While cleaning regularly can help remove spores on the surface, more can still cycle out from deep within your air ducts. As a result, you experience poor-quality air.

The pollen and dust that travels through your ductwork can be cleaned with the help of Cyclone Professional Cleaners. Our team uses industrial equipment to clean your vents without toxic chemicals and cleaners. A high-powered vacuum with a large hose creates negative air pressure inside the ductwork. A brush sweeps the pollen off of the duct surface so the vacuum can suck it away.

Cleaning your ducts at least once per year will prevent pollen deposits from building up in your air ducts, so your family can enjoy breathing cleaner air.

2. Clean Home

When air flows through your vents, it can pick up dirt and dander and distribute it throughout your entire home. This debris contaminates the air with microscopic particles that can irritate your respiratory system. When they finally land, these particles will create a layer of dust across the surfaces in your home. As dust builds up, it becomes rather unsightly.

Having your air ducts professionally cleaned will reduce the debris that flows through your AC so you can give your feather duster a break. As a result, your home will look and feel more polished in between cleanings.

air duct cleaning

3. Fresh Scent

Have you ever cleaned your home top to bottom but still smelled a stale odor when you were done? Things like mold, mildew and even cooking odors can collect in your air vents and create a musty smell that’s untouchable with regular cleaning.

A deep clean by professionals can remove built-up dust and grime that can produce an unpleasant scent, so your home will look clean and have a fresh scent to match.

4. Efficient Air Conditioning

To keep your home cool and comfortable, your AC system pushes chilled air through the ducting into your home. If you have dirty vents filled with years of dust, your AC will have to work harder to transport the air.

Tiny dust particles are insignificant in small quantities, but a buildup can prevent your AC from working at full efficiency. Over time, it’ll consume more energy as it works to push past a collection of dander. This extra effort can make your energy bill go up little by little every year.

Luckily, you can keep your energy costs down by cleaning your dirty air ducts. Cyclone Professional Cleaners can remove built-up debris so your AC can function at peak efficiency.

Air Duct Cleaning by Cyclone Professional Cleaners

Now that you understand the pros of cleaning AC ducts, you likely want to schedule a cleaning appointment! For professional air duct cleaning services, you can trust the experts at Cyclone Professional Cleaners to get the job done. We’re a family-owned business that offers air duct cleaning services to the Plano, Dallas, and Mckinney areas. We use special equipment and non-toxic cleansers to clean your ducts, so your space looks and feels cleaner and your family can enjoy a healthy indoor environment.

Our team will clean your air ducts so you can enjoy fresh air in your space. We also offer carpet cleaning, power washing and various other services for your home or business. Get a free quote today!